
I’m at the tail end of re-decorating my living room right now, and although at this very moment it looks like complete and utter chaos, it’s actually starting to all come together. I’m down to the little finishing touches like pillows and accessories, and I’m beyond excited to show you all the full reveal of what the space looks like! Because I’m sure you’re all dying to see where I curl up and watch my favorite reality TV shows at night, right??
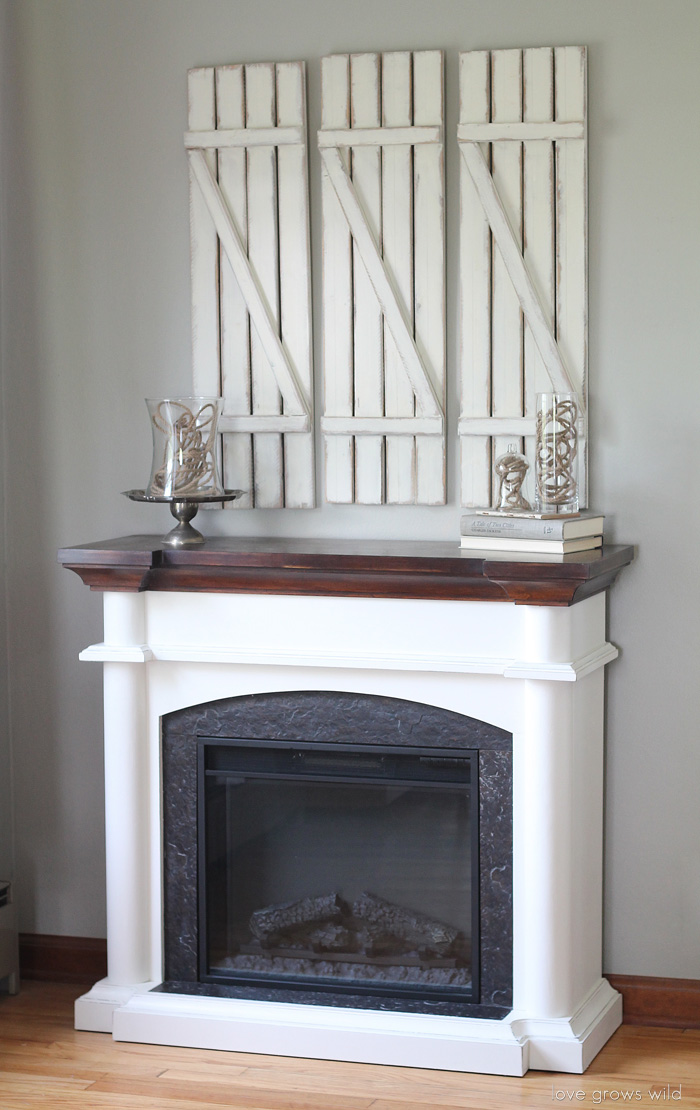
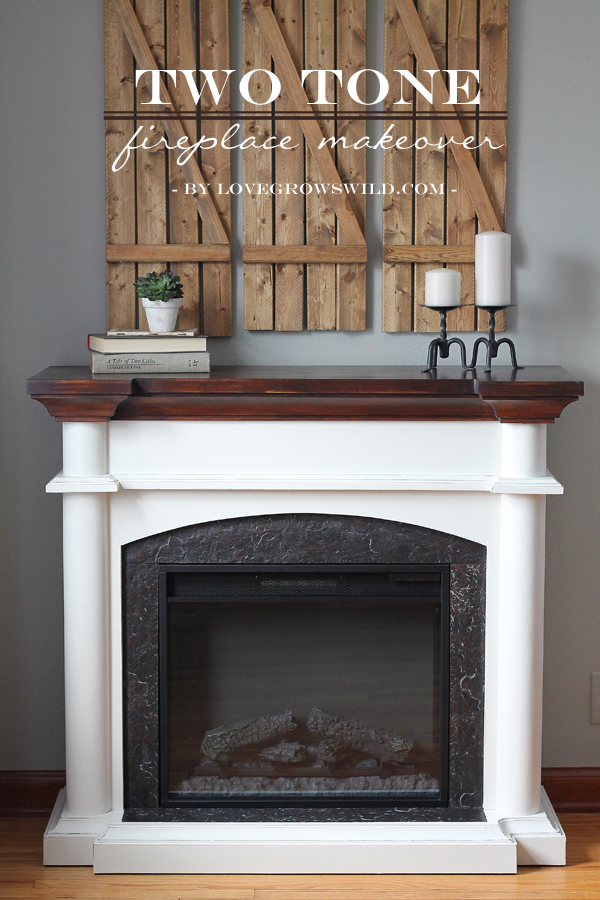
One project I tackled this week was the area above my faux fireplace. Earlier this year, I made these awesome-sauce DIY Barn Wood Shutters that I just adore. They were super easy and cheap to make, and it added a ton of texture and dimension to that blank wall space. Seriously, LOVE them. What I didn’t love… was the color I picked. (You can see the original color here.) I wanted to keep the shutters a natural wood color to let all the beautiful wood grain show through, but the color I chose didn’t go well with the two-tone paint job I did on the fireplace mantel. Bummer, dude.
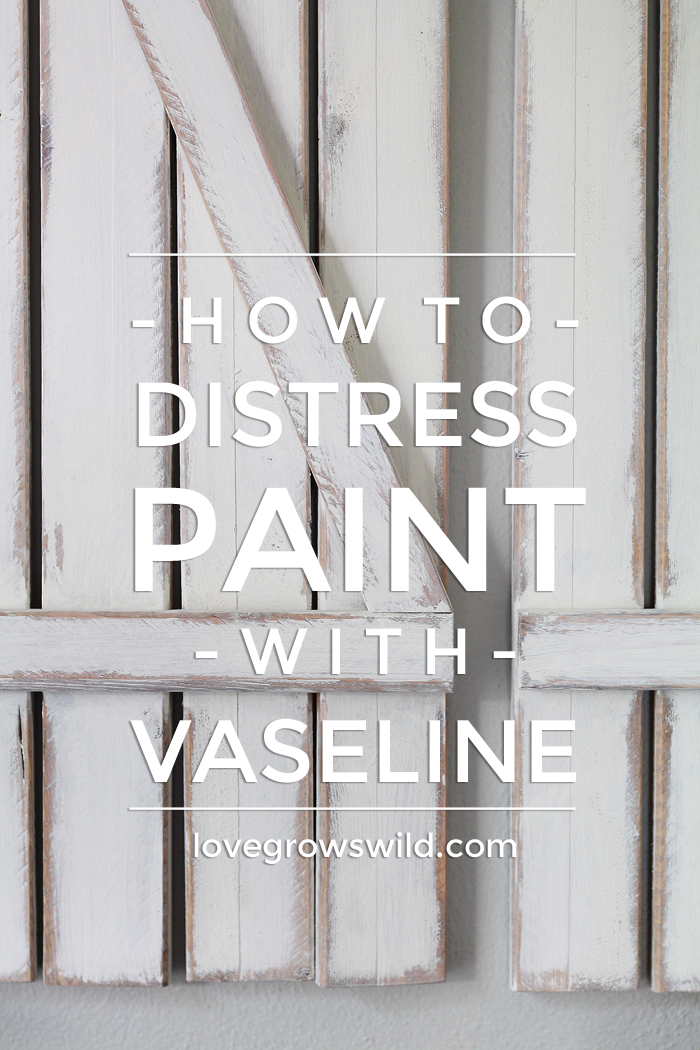
So I took this opportunity to test out a paint trick I’ve wanted to try for a loooong time, and it worked so perfectly that I decided it deserved its very own blog post! It’s THAT good! If you’re a fan of vintage, distressed furniture but not into the hours upon hours of sanding it takes to achieve that look, this tutorial, my friends, is for you: How to Distress Paint with Vaseline!

Supplies:
Vaseline
paint and brush
damp rag
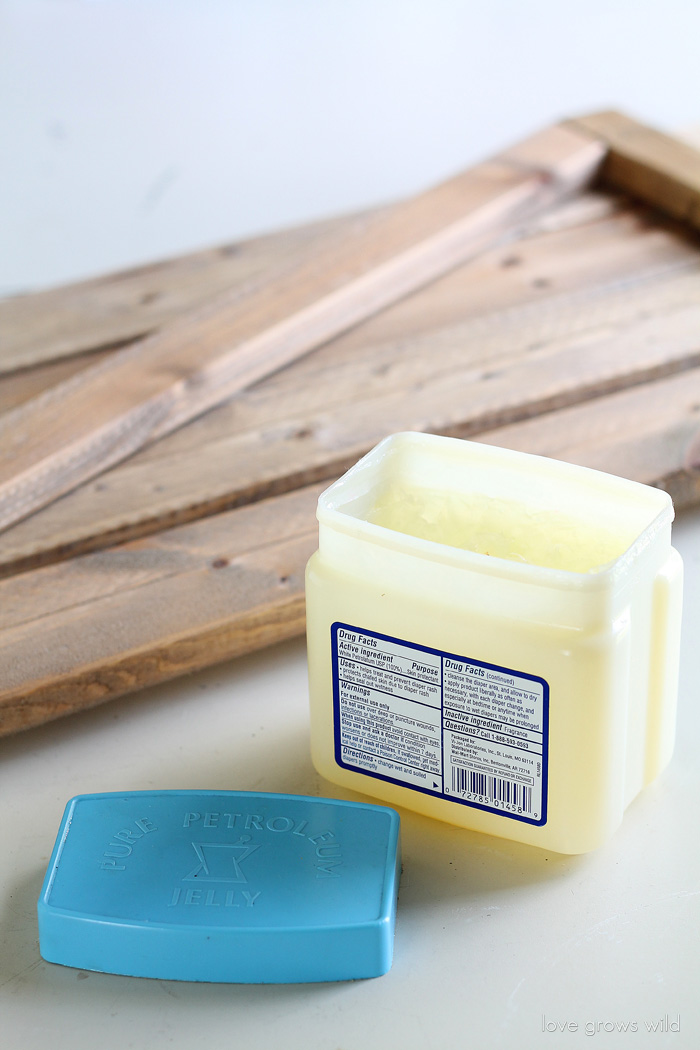
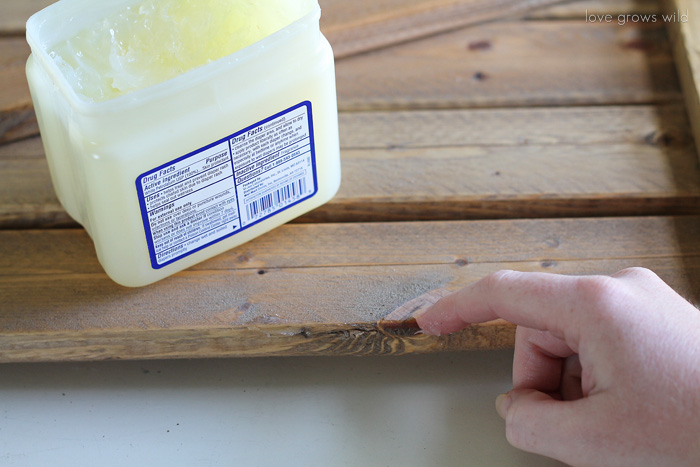
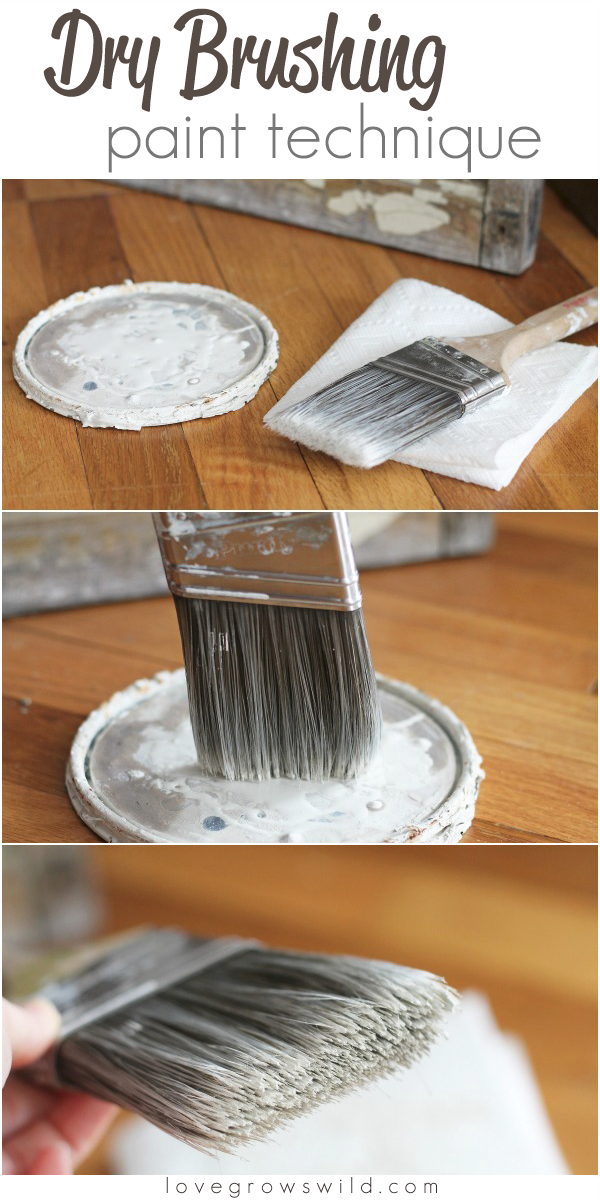
STEP 1: Apply a thin layer of Vaseline to the edges of your project and anywhere you want a distressed look. Note: Your paint will NOT adhere where you’ve applied the Vaseline, so make sure to use it judiciously!
I find it easiest to scoop up a blob of Vaseline and apply it with my finger, but you can also use a cotton swab if you want. If you’re going for a rustic look, don’t worry about being precise with the Vaseline. Apply a little more in some areas and a little less in others to give it that natural aged-over-time look!
STEP 2: Paint your project.
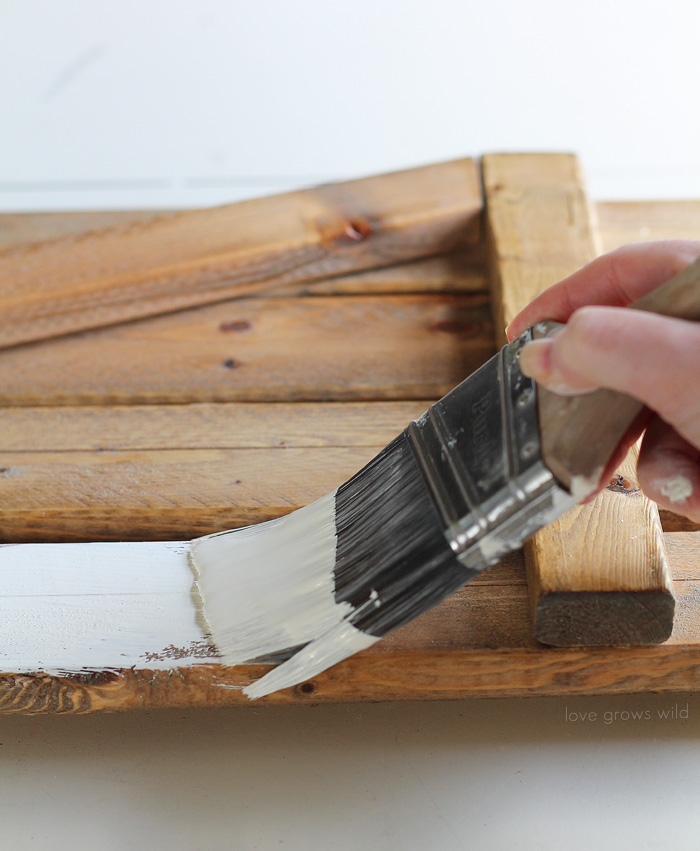
You may notice in the photo below that the paint didn’t want to adhere over the edges where the Vaseline was applied. That’s good!
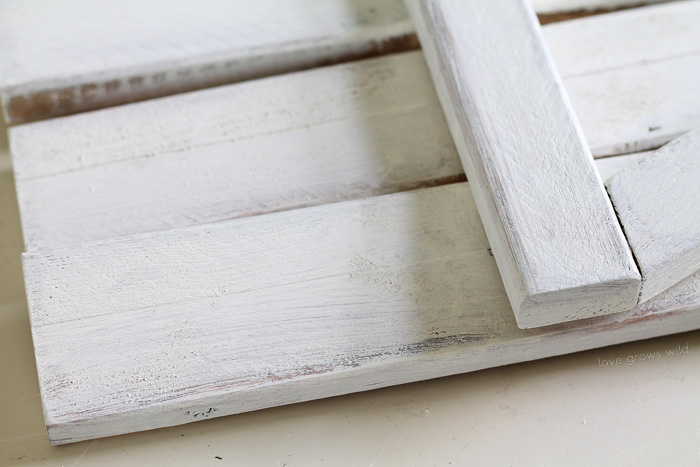
STEP 3: Allow the paint to dry slightly (not wet to the touch), then use a damp rag to rub over the areas that have Vaseline. The paint should wipe away easily, exposing the layer underneath the paint. How do you like that magic??
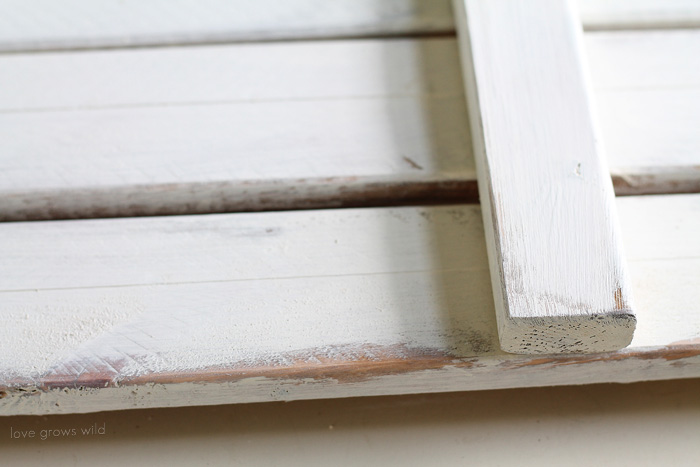
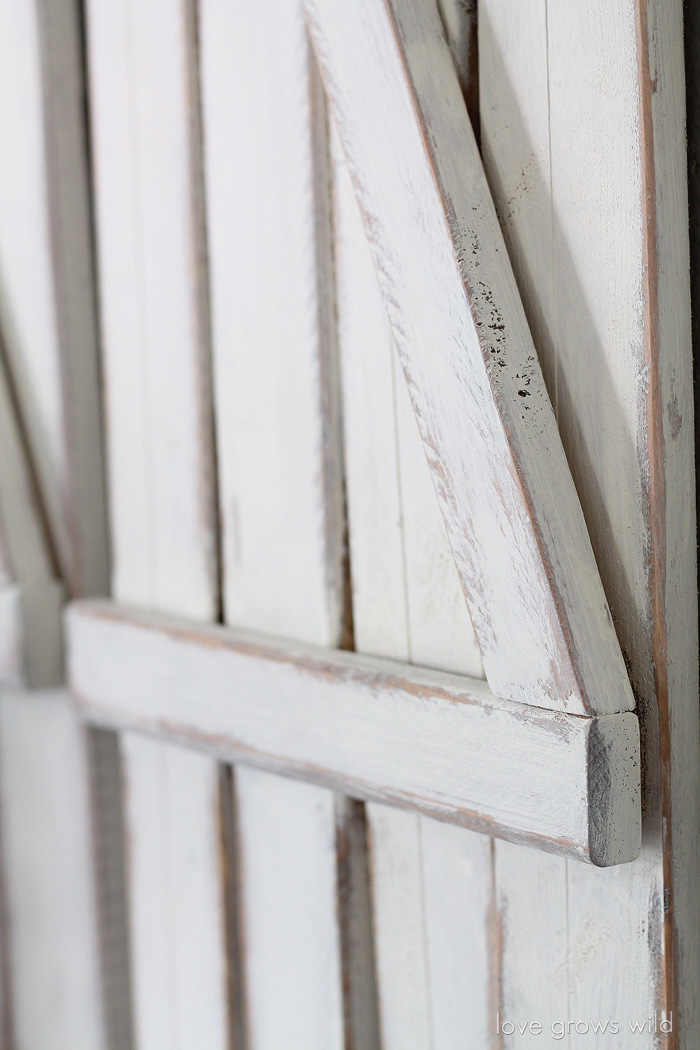
It would have taken me forever to sand all those little spaces between the boards, so this Vaseline trick was the PERFECT solution for giving these shutters an aged, distressed paint finish. The best part… I didn’t have to sand a single thing! Now THAT makes me a happy girl!
Here are the shutters hung back up above my fireplace:
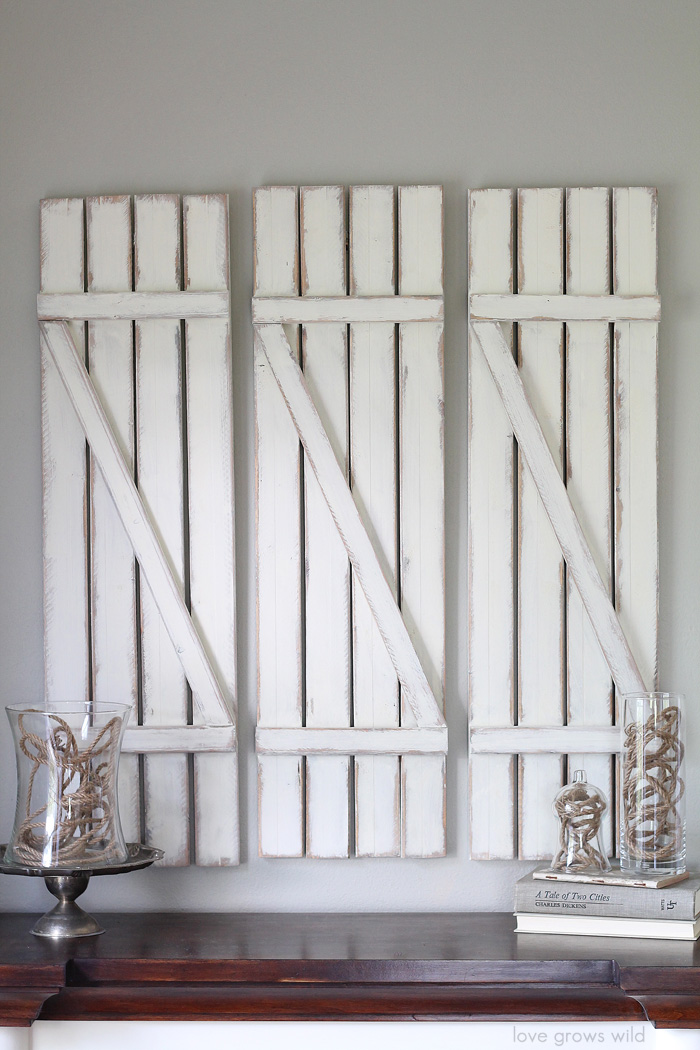
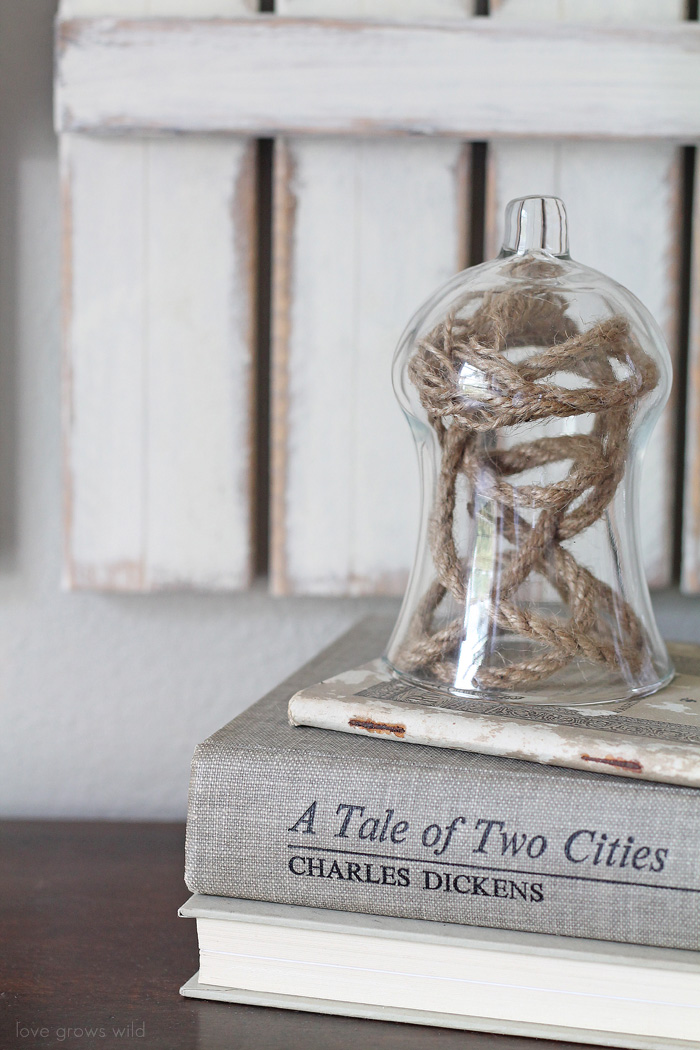
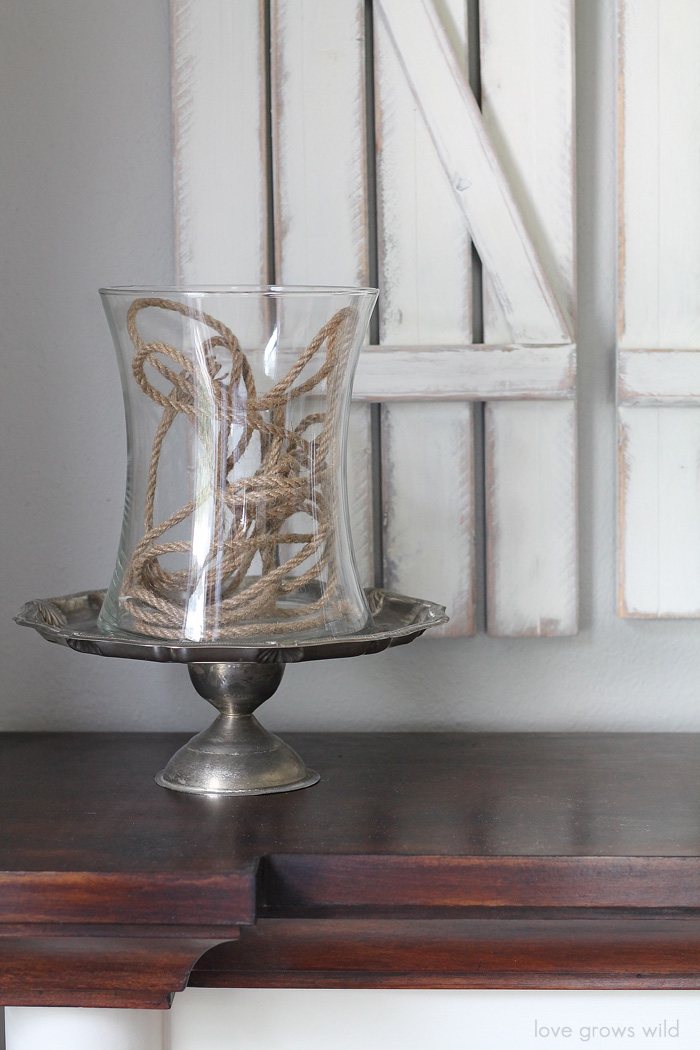
I had a surplus of rope in my overflowing craft stash, so I wrapped a few pieces inside some glass cloches and vases for a little wink and nod to summery, nautical decor.
I have a million fun ideas for decorating my new white, bright shutters, but for now this simple, minimalist look will do the trick. Just a few more projects left to go, and I’ll be ready to show off the full living room reveal! Stay tuned!
Like what you see? Subscribe to Love Grows Wild so you’ll never miss a post!
Follow along on Pinterest, Google+, Instagram, and Facebook for more fun!
More Painted Project Ideas:
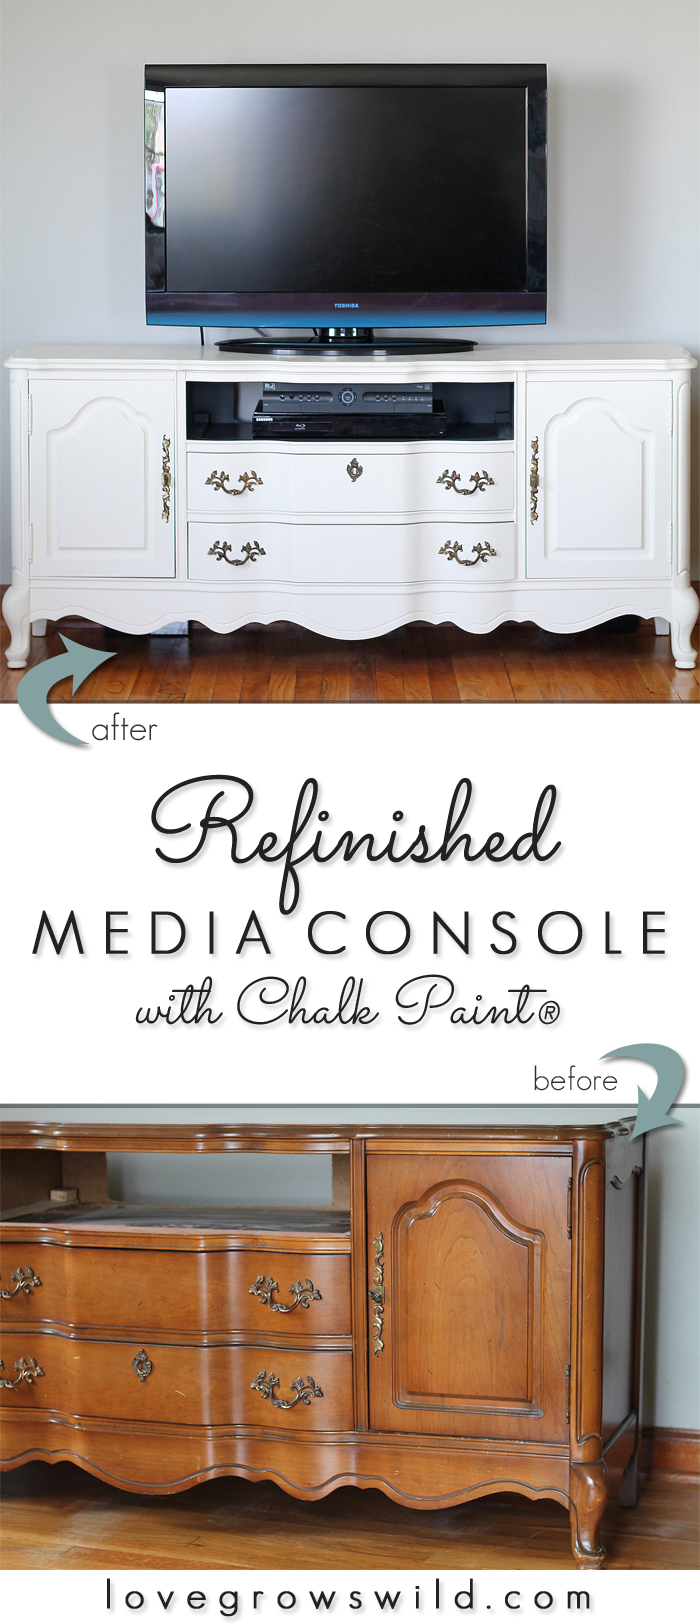
Chalk Paint® Refinished Media Console
LET’S KEEP IN TOUCH!
Subscribe to Blog | Browse my Shop | Follow on Facebook | Follow on Twitter
Follow on Google+ | Follow on Pinterest | Follow on Instagram

Great tip! I never would have thought of using vaseline as a way to distress wood! This is something I’m definitely going to try! Pinning!
I think you’ll love this Vaseline trick, Katie! It’s a huge time-saver! Thanks for the pin, girl! 🙂
Love this!! I’m trying it for sure this summer 🙂 Thanks for sharing..
You’re welcome, Gerry! Have a few projects up your sleeve, do you?
I am so happy I found this post today, via a link party. I have a very ornate frame that I want to paint and distress, but I was trying to figure out an easy way to do it. I can not wait to try this. Thank you so much!
That is exactly the type of project to use this Vaseline trick for! It would make life so easy distress all those little nooks and crannies of your frame! You’ll have to let me know how it turns out for you. 🙂
Love this!!! TFS new subbie here 😀
Hello! I’ve been enjoying your blog for quite some time now, and I’m always eager to drop by and see what new projects you’ve got going…. I love it!
I’m a lover of distressed over and over…. The rustic elegance it captivating. I can’t wait to try this easy method out! Thanks for the inspiration, Liz!! 🙂
You are just too sweet, Kelli!! I’m so happy that you enjoy what I have to share. 🙂
And I totally agree with you… the “rustic” style is just beautiful! I always find myself distressing whatever I’m working on because it just adds so much character. Thanks for stopping by to say hello!
I’m fascinated to see differing methodology, and this is a first…pinned!
That is so cool! I had no idea that Vaseline could be used that way. I need to find something to paint! 😉
Isn’t that such a neat trick?? I’m getting ready to paint a couple of end tables that aren’t “real” wood, so I’ll probably use Vaseline to distress those as well. Trying to sand the faux wood probably won’t work out very well! You’ll have to let me know what you think after giving this method a try!
I can’t wait to try this technique. Thank you for sharing 🙂
Was wondering what kind of paint you used, oil or water base?
You’re so welcome, Jamie! I think you’re really going to love it! For this particular project I actually used Chalk Paint, but I’ve also used water-based paints as well. Have fun painting!
Hi, I came across this on Pinterest. I have a couple questions. Using the Vaseline on the paint, wouldn’t it mess up the paint so that if you sealed the piece when done, the polycrylic wouldn’t stick? Could you do like a alcohol wash over the areas where the Vaseline was to cut the “greasyness “ off the paint? Am I making this too hard and the Vaseline just wipes off and you could seal over top? I want to build a special noodle board for my sister and this technique has the end result I’m looking for for the project. Thank you for your time. Wayne
Liz,
It Was exactly what i was looking for.
I’m sooooo happy with this Vaseline alternative.
Thank you thank you thank you!!!
Liz,
It Was exactly what i was looking for.
I’m sooooo happy with this Vaseline alternative.
Thank you thank you thank you!!!
You’re so welcome, Maraima!! 🙂
Just tried it on some picture frames that I made from leftover baseboard trim. It was awesome!! So fast. I just used cheap acrylic white paint, and I’ll go over it with a spray sealer. I’ll definitely be doing this again… Hopefully on the legs of a a farmhouse table I want to make!
Isn’t this technique awesome? I bet your frames look fantastic! Good luck on your farmhouse table!!
Love this but I was wanting to know would this work using spray paint you think? I’m repainting a wrought iron bed…or do you have any other suggestions making a distressed look?
Sounds like a fun project! I don’t think I’ve tested this technique using Vaseline and spray paint before, but I’d imagine it would work the same way. You’ll have to let me know how it turns out!
I was thinking the same thing. I have metal I’d like to try with spray paint using the vaseline metod. Did you try it? How did it work? Thanks.
I love painting furniture, but I’m still relativelly new to it…I’m trying to learn some good tenchniques. I want to give this look to a farm style table, but I’ve already painted it the colors that I want…is there a way to accomplish this distressed look now? I guess I did the whole thing kind of backwards!
Don’t worry, Alex, I learn as I go too! You can definitely still distress the table after painting it, just not using this vaseline technique. If you rub some sandpaper or a sanding block on the edges and corners (or anywhere you want to add some distressing), the paint will start to sand away, letting the original finish underneath show through. I hope this helps!
What a great time saver idea. I make a lot of kids toys and stuff, but mostly out of MDF(Supawood). Some of my clients want the distressed(OLD) look, and that is a lot of sanding and sometimes repainting. Do you think the vaseline trick will work on MDF.
Thanks
Piet
It is a great time saver for sure! A lot of people are looking for the distressed look these days, and I think this would work just fine on MDF. You’ll have to let me know!
I was a fan of your shutters with the stained wood look and now they look wonderful in this distressed white too. You’ve inspired me to try making some. Thanks for sharing!
I think you’re going to love these shutters, Robyn! Thanks so much for stopping by!
what a clever idea! i can’t wait to make something so i can distress it.
Thank you, Dawn! I think you’re going to love this technique!
Im going to use this tip…..going to be distressing my kitchen table this week………….changing it from black to red
Fun!! I bet that’s going to look amazing! Enjoy your painting. 🙂
I am tearing the 16 year old carpet off my stairs and about to start a distressed paint job. I was not looking forward to all the sanding to get the desired look… Can’t wait to try this technique!
Painted stairs… be still my heart! I love that look! I think you’re going to really like this technique, especially with an entire staircase to do. Let me know how it turns out!
Sounds like a great idea! Thanks.
Thanks for the tip. I will try it on my next project.
You’re so welcome, Dina!
Did you use water base or oil base paint?
Hi Betty! I used water-based paint for this project.
I was just searching on Pinterest looking for a way to shabby chic my 30 year old wood paneling. It’s so dark in my living room, and I wanted to keep the crevices dark so it would look like bead board, and I think this trick will work well. I may have to buy quite a lot of Vaseline, but that’s better than sanding all those crevices! Thanks.!
Ahh… wood paneling. We had that all over our old house! I think you’re right, the Vaseline would be perfect for keeping those lines visible. Let me know how it turns out!!
Doing the vasaline technique and would like to know what I should use as a sealer
Hi Sue! You can use any sealer you would normally use on a painted piece, but I particularly like this one from Rust-Oleum: http://www.rustoleum.com/en/product-catalog/consumer-brands/varathane/soft-touch-polyurethane
It doesn’t yellow at all and has a great matte finish (not glossy). I hope this helps!
Hello! Can you use this technique on metal? And with spray paint? Thank you for this post. So interesting!
Hey Erin! I haven’t tried this technique with metal before, so you’ll have to let me know how it turns out! I would definitely make sure the spray paint you choose will bond to metal, but other than that, I think the Vaseline would still work beautifully. Best of luck, and let me know how it goes!
Love the idea! One neat thing you could do with the shutters when you are wanting a new look would be to turn them around so the smooth sides are placed altogether and put a large initial on them, painted a different color of course.
Fantastic idea, Brandie! Thanks for sharing! 🙂
So much more easier than sanding thanks for the elbow grease you saved me…
Yay! You are so welcome, Stephen!!
Love the Vaseline treatment. I’m fixing to try this,I have a guestion.Like most furniture there is a clear shiny coat over wood.You don’t have to sand off that?
Hey Cindy! For this project, I started with raw wood, so no sanding was necessary. But if you’re starting with a finished piece of furniture, it’s a good idea to sand it down first before painting. I hope this helps!
Hey there Mrs. Liz! This is one of the neatest ideas that I have seen! I wonder if you have had experience with using stain to distress wood. I mean I like the darker turqoise or teal distressed look with the darker color showing through. Can you achieve that look with the vaseline as well? Let me know what you think, please!!
Hey LeeAnn! Yes, this would work beautifully for that kind of application. The vaseline basically doesn’t allow the paint to stick to the surface below, so painting a fun turquoise color over stained wood would be awesome! You’ll have to let me know how it turns out for you. 🙂
Hi there,
Love your work, what else can I say that everyone else has said , but thanks for this very helpful tip because, It saves me time, labour and sand paper.
Love your taste to in décor and your talent,
Many thanks from Little New Zealand.
Have you tried to distress kitchen cabinets. Remember that rental house you had w/the brown/orange cabinets. Got those & sick of them!! I want to paint & distress them. Any thoughts?
Hey Shelly! No, I haven’t tackled any kitchen cabinets yet, so I can’t give you much advice there. This Vaseline distressing technique would definitely work well on the cabinets, but I’d recommend testing it out on something smaller, maybe small table, before trying it on the cabinets. Sorry I can’t be more help!
LOVE this idea! I just recently bought a queen sized murphy bed and storage towers that are painted black wood. I was dreading the refinish work this beast would require….but alas….you saved the day! Thanks so much! Will try to send a pic of the finished product!
Excellent idea! Definitely going to give this a try. Thanks for the tip.
love the Vaseline idea………will use it…thanks! I’m going to make a wood valance over my bedroom window using words to a song that I love (In dreams I walk with you…..)
Absolutely, the best tip I have yet to come across! What a wonderful time saving idea not to mention the same effect that you would get from endless, messy sanding! You rock! Keep your tips and tricks flowing! Thank you for all your tips, tricks and hardwork!
After I paint and sand the edges of the piece I have painted, I often stain those sanded edges to give an older look. Do you think that the vaseline method work with this, if I wash the edges with soap and water before applying the stain?
As long as you clean the Vaseline off really well before before applying the stain, that should work just fine. Have you ever tried using a dark wax instead of the stain? I really like using a dark wax to give painted pieces that “older” look!
This is soooo great.! Thnx I was wondering if any color will get the same look/affect.? & if spray paint will work.? I just found you do u have more ideas/crafts.? Do i just go to lovegrowswild.com or ? I’m just a lol computer alliterate: loll thnx again hope to c many/much more of your stuff
Hi Rhonda! Welcome to Love Grows Wild! Yes, any paint color will work, and although I haven’t tried it myself, spray paint should work as well. The Vaseline just creates a barrier between the paint and the work surface so that the paint doesn’t want to stick.
To see more of our projects, head on over to the Project Gallery: https://lovegrowswild.com/project-gallery/
Love love love these great ideas!
Thanks for this fantastic trick!!! I am definitely going to try this out this weekend however, I was wondering if this technique will work equally well on Ikea melamine wood?
Yes, I would think so! The Vaseline just basically prevents the paint from sticking to the surface you’re painting, so it should work like a charm! You’ll have to let me know how it works for you. 🙂
This is a great idea I have a table that I will try this on. Do you think you could use two different colors of paint I mean paint one coat of paint then put the Vaseline down and paint over with a different color of paint?
Absolutely! That is a fantastic idea, Kathy. Just make sure your first paint color is completely dry before adding the Vaseline and second coat of paint. You’ll have to let me know how it turns out!
idea fantastica ! grazie molto interessante
I CANNOT wait to try this! Have you ever used spray paint with this technique
I haven’t tried the Vaseline with spray paint, but it should work just the same. Anywhere you put the Vaseline, paint won’t stick, so it should work! You’ll have to let me know if you try it!
Once your done distressing with vaseline, what is the best way to remove the vaseline so I can put a top coat of polycrlyic over it
Hey Wayne! That’s a great question! On the pieces that I’ve used vaseline, I haven’t necessarily needed a top coat, so I’m not sure. In my experience, the vaseline sort of “soaks” into the wood after a few days, so you would probably get the best results by letting the piece sit and “dry” for a few days and try the poly after that. If you try to do it right away, the vaseline will most likely affect the finish. Once I know the paint is good and dry, I just wipe the vaseline areas really well with paper towels to remove any residue. You’ll have to let me know how it turns out!
I have kitchen shutters that are not my favorite color, they are like a sage color. Can you use the Vaseline on shutters that have been previously painted? Then paint over them w/ a cream paint and still have the distressed look?
Hey Kim! Absolutely! If you apply the Vaseline over the existing color on the shutters then paint them, you’ll see the original sage color when you distress the areas where you applied the Vaseline. If that’s the look you’re going for, then you’re good to go! If you’d rather see a different color underneath the cream paint (maybe black or brown), paint the shutter that color first, then apply the Vaseline and paint them cream. I hope this helps!
on the Vaseline distressing, I use rollers and oil-based paints. Can Vaseline be used with that too?
Hi Connie! The Vaseline basically just creates a barrier so the paint can’t adhere to the surface you’re painting, so it should work just fine! Let me know how it turns out!
What paint is better to use for a distressed table. Oil based or water based?
I personally like using water-based paint just because the clean up is so much easier than with oil-based. Either will work for distressing though!
Love this! I have never heard of this before. Being a huge fan of anything distressed, this will make my life so much easier! Thanks for sharing.
Je trouve ça magnifique je vais essayé sur une table merci beaucoup d avoir partager.
I have never distressed anything before. In fact, I have never painted anything before. But when my cabinet door-selling husband came home asking what to do with all the imperfect cabinet doors they have, my creative side kicked in. I started looking for ideas for repurposing cabinet doors. I came across your blog and I love it. My first project will be using vaseline to distress! Thank you!
Hi Julianne,
I am looking for cabinet doors for a project I’m planning. I live in Indiana, but can’t find any used or imperfect doors that I can afford. I would love to find out if you are in my area and if you have any cabinet doors available for sale? Thank you!!
I don’t, Pattilou. Wish I could help more!
I love this and was excited about doing this with a dresser but as I am reading all of the great ideas that are flowing …..I am going to do this to my vintage kitchen cabinets! They are rustic . I like them but they are outdated. Wow thank you so much!
Help!! I’ve paid yes my kitten caninets a bright greenand it looks too…..complete. Any way to distress already painted cabinets to scuff it up a bit?
Hey Kim! Absolutely! Grab a sanding block and go to town… I’d try sanding along the edges of the cabinets for a naturally worn look!
Gorgeous idea! Will definitely be making this!! x
Great idea! I’m going to try this. Can’t put much elbow grease in to diy since a bike accident so I’m lookin for easy ways to do stuff. Thanks Liz, Colin.
What are a lovely person you are, so many don’t bother to reply and you always do and always encouraging as well. Thank you and all the best .Have a great 2016.
Hi,
I’ve stained an old small table that was originally white-washed over pale wood. Then I painted it pale green, didn’t like it so I have used 3 coats of wood stain. Would I be able to Vaseline this and dry brush it white so it still has patches of stain? Would the pale green colour still show through? I live in England and would be very grateful for your help
Hi Tracey! I’m curious how the wood stain looked applied over the green paint. In theory, the Vaseline acts as a buffer between the old finish and the new paint, so it should work nicely for you! Let me know how it turns out!
Hi many thanks for sharing this. Just one dumb question as I have never done anything crafty before. What kind of paint am I supposed to use? I see your paint has no gloss which I like. Also how can I do this but in dark brown? Would I need two colors? applying one layer first then the other I have no idea thanks a lot if you reply.
That’s actually a great question! I’ll use chalk paint a lot of the time, which has a really matte, chalky finish, but any paint in a flat sheen will work as well. I’m not a big fan of glossy finishes either. 🙂
Do you want your top coat to be a dark brown paint? Do you want to see wood or another color underneath? Anywhere you apply the Vaseline, paint won’t adhere to. So if you want brown paint over the natural wood, just apply the Vaseline to the wood and paint over it. If you want a color to be seen underneath the brown, paint that color first, then apply the Vaseline, then paint with the brown! I hope this helps. 🙂
I am BEYOND excited to try this method out. My hubby and I are redoing a bathroom in rental we just purchased and I wanted to spruce up the old vanity in a really cool way. This method looks easy enough that I am willing to try and I’m not the most artistic or creative person out there. Thanks so much and I’ll post pics after I’m done testing it out.
Liz!! I came to your website after finding this pin because I’m going to try it today and my jaw dropped once I got to your site! I don’t know if you remember me but we worked together years ago! I am so impressed with your website, there are so many great tips and ideas! You are so talented and I hope you and your family are doing great!
Kylie!! Of course I remember you from our tanning salon days! I hope you’re doing well… keep in touch!
I would live to try this with the unfinished dining room chairs my husband bought to go with the farmhouse table he built for me. My question is this: after using this technique and allowing the paint to dry what would you use to protect the paint on the chairs? We used a healthy coat of polyurethane on the table, but I wasn’t sure if we should do the same on the chairs? Thanks!
Sounds awesome, I cannot wait to try it. I just have a couple of question: how will this turn out on a wooden photo frame? Do you think this would turn out cool looking if I did this with hot pink? I hope you get this and have time to reply. Thanks for the tips Liz!
Thanks for sharing your experiences. I’m doing some research on painting. I have an old coffee table and I want to paint it. Now I know how to do that.
Great tip! How did you ever think of that?
Just found your site today, and I’m trying this technique on a metal garden table.
THANK YOU SO MUCH for this wonderful technique!! This saved the day on my (first ever) indoor shutter project! I did a test of techniques on the back of one of them, and even though I had painted a layer of tan first (to match my wall), before painting on the black, if I would have used the sanding technique, the OLD original green paint would have shown through messing up the look I’m going for. The Vaseline was perfect and so easy to do. They only tricky part is that it feels like you are distressing it a bit “blind” since the Vaseline is clear. So, I prayed it would turn out beautifully, and when I rubbed off the dry-to-the-touch paint, it revealed just the look I was hoping for. Thanks for sharing! 🙂
Thanks ☆Can’t Wait to try this tommorw !!!!!
What kind of paint did you use for the white?
Thank I try this